
Set Up Mobile Detailing Scheduling and Billing
A setup for keeping mobile detailing requests, bookings, and billing from slipping between messages.
Published
On this page
A detailing request often starts as a message: what kind of vehicle, what condition is it in, and where will the work happen? Meanwhile, products, towels, and travel expenses can pile up without making it into the books. Before you promise a time or price, collect enough detail to plan the job. Opsentric helps you track the customer, follow-up, schedule, and billing; it is not a vehicle inspection or inventory system.
Where detailing bookings go wrong
- A package name hides a different amount of work. Use a lead to record the vehicle, condition reported by the customer, and requested service. A proposal can then present clear scope choices instead of treating every interior clean as the same job.
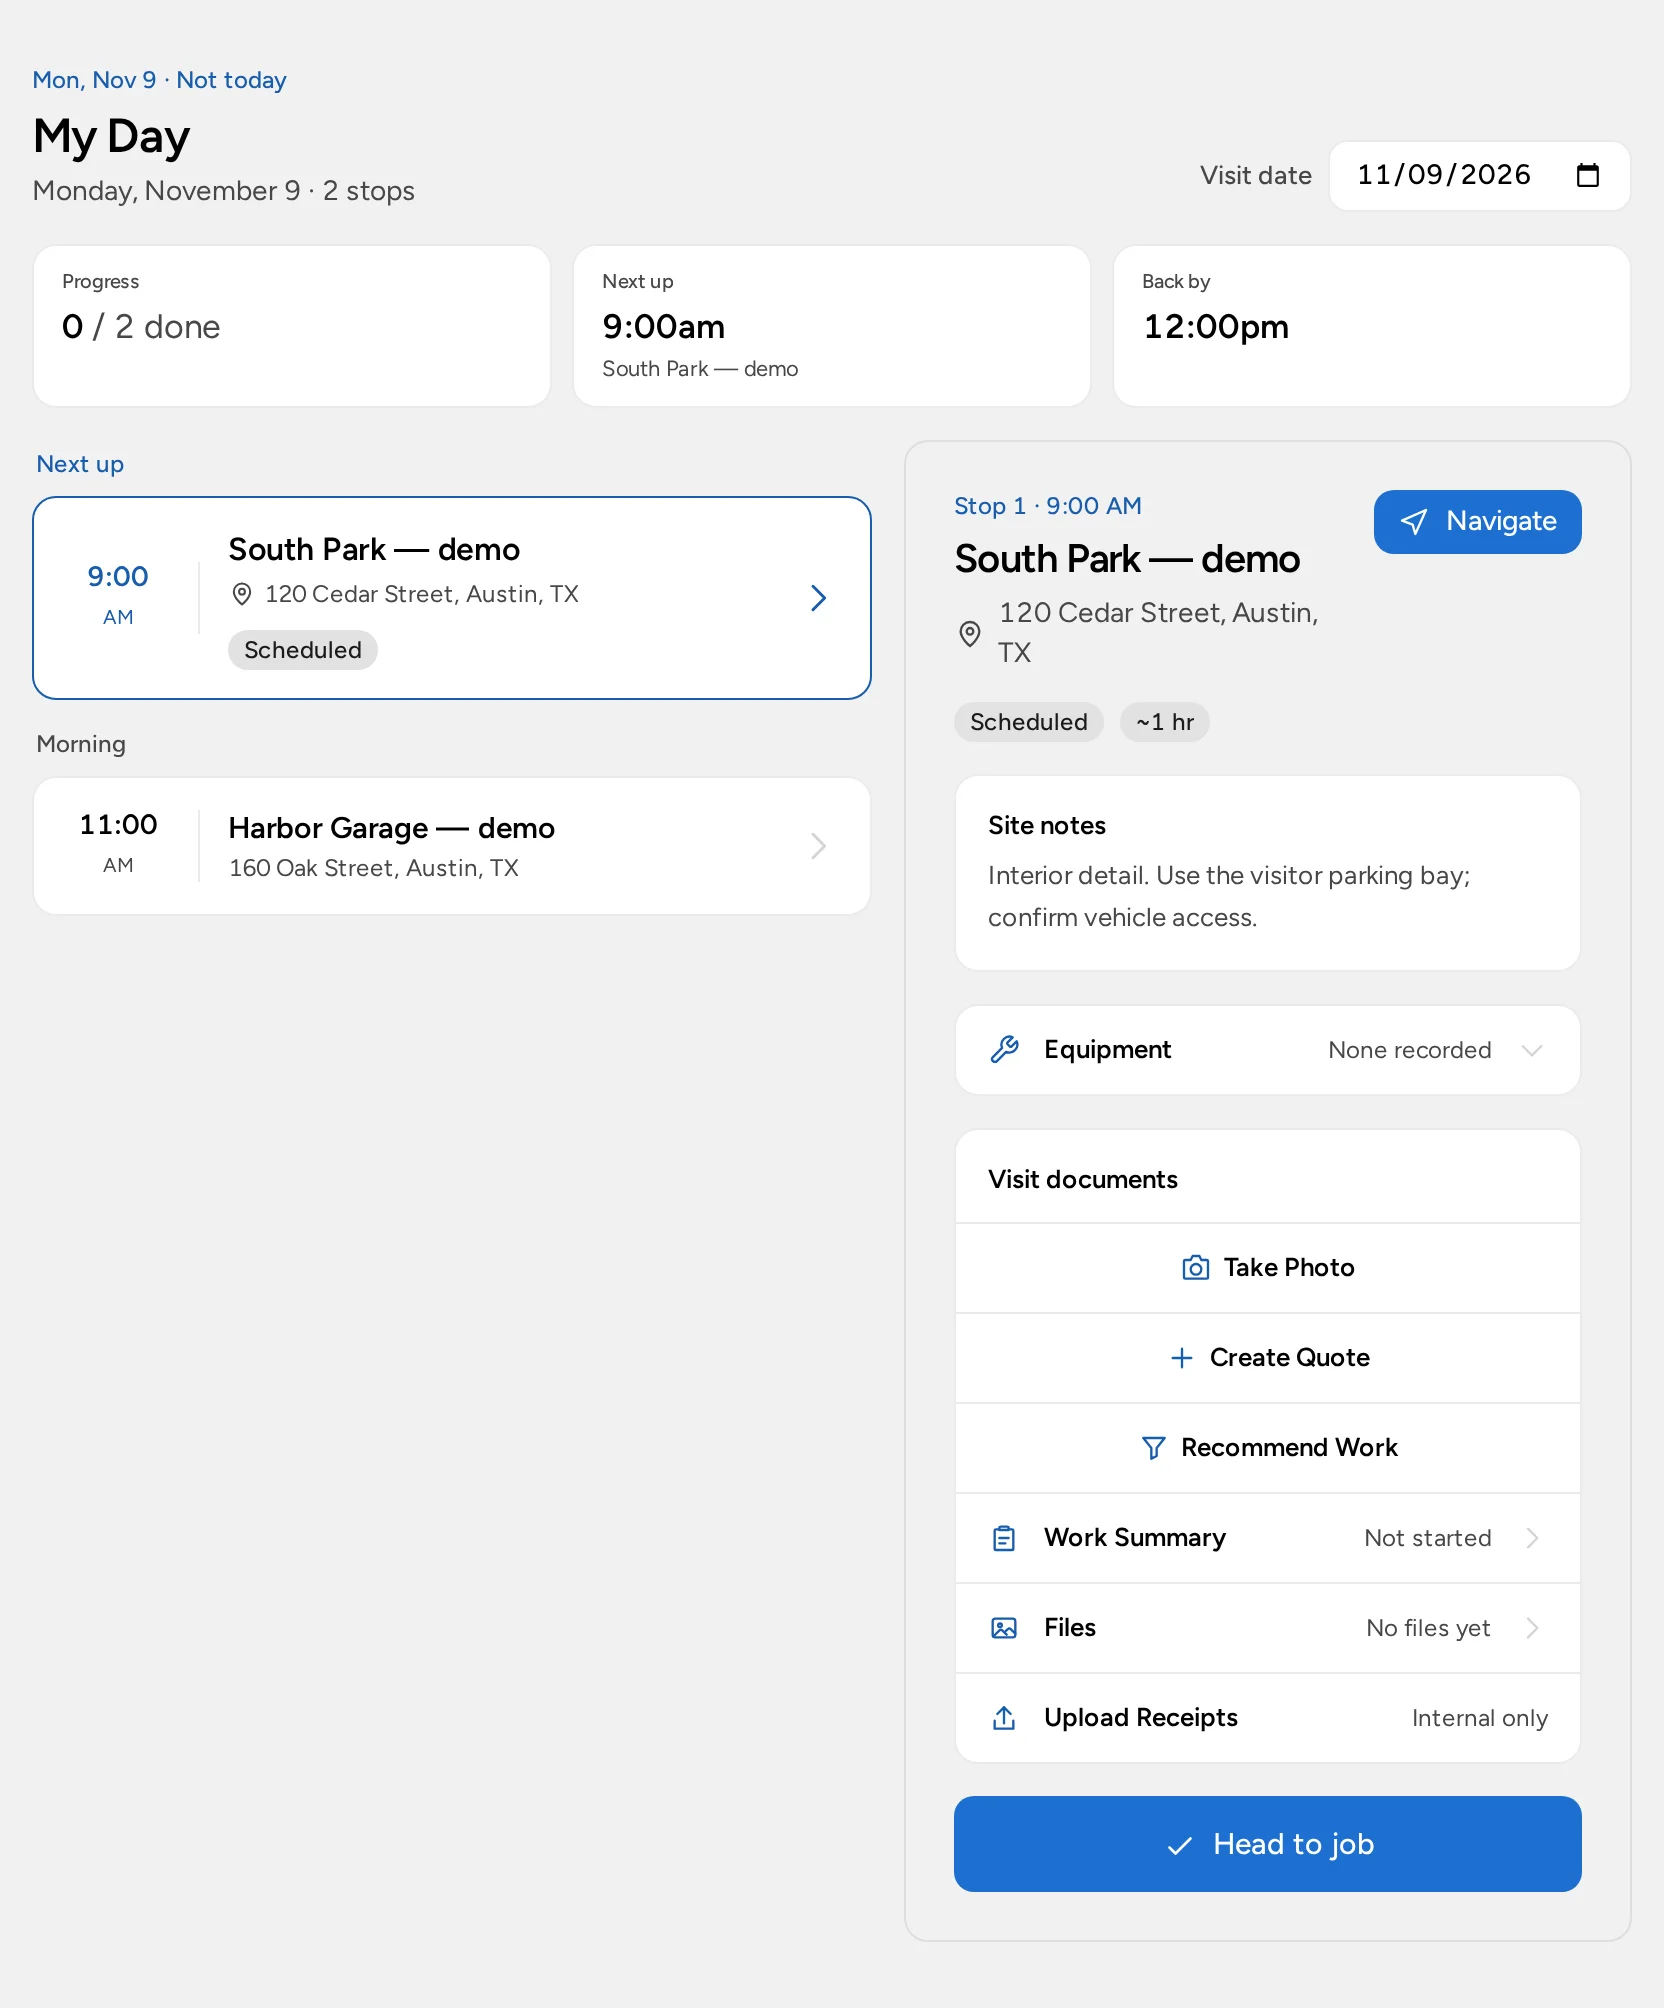
- The vehicle moves, but the booking still points home. Keep the customer and mobile work site distinct. An assigned Field Service visit gives the detailer the intended address and site notes to check before traveling.
- A full calendar looks better than the bank balance. Review invoice balances alongside product and travel expenses. Opsentric keeps these financial records, but a booked or completed detail is not a confirmed payment.
Set up your organization before taking bookings
- Choose your business identity and financial defaults. Add the name and contact details customers should see on documents, then check your country and Time zone. Review Organization currency, Starting number, and Padding width before creating the organization; currency and invoice numbering cannot be changed afterward.
- Match the workspace to your operation. Self Scheduling provides personal time blocks; Basic or Pro with the Field Service add-on supports assigned visits at customer locations. Decide who handles inquiries, dispatch, invoices, and receipt review. A detailer who uploads supply receipts does not need everyone’s finance access. Use the first-workday checklist to review responsibilities.
- Set up Stripe for customer credit card payments. Once the workspace is created, someone with settings-management access opens Administration → Payments and chooses Connect With Stripe when offered. Complete provider onboarding, check Accept customer payments and Receive bank payouts separately, then select an active Online payment income category and Save Income Category. This is separate from the card used to pay Opsentric. Read the Stripe connection guide before offering checkout after a mobile detail.
Capture the request before quoting
Add the customer and record the vehicle details and requested work in a lead note. Ask whether the job is an interior clean, an exterior detail, or something that needs an in-person assessment. Record a follow-up so you remember to confirm the scope. The lead workflow guide explains how to keep inquiries moving.
If the customer has sent photos or special requests, review them before committing to a fixed price. A proposal can describe options the customer can choose from when the scope is clear; see how to prepare a proposal. Don’t imply that Opsentric diagnoses paint condition from a photo.
A customer with two cars may need two different services, even though the contact and work address are the same. Give each proposed piece of work a recognizable lead title and a follow-up if you still need photos, condition details, or a decision on the package. A lead’s estimated value isn’t a charge. If a customer requests a coating and an interior clean, describe the options clearly rather than assuming one price covers both.
Keep the contact and work location distinct
For mobile detailing, the place you work may not be the customer’s billing address. Create the customer first, then add the service location you will visit. Confirm access to water, power, parking, and the vehicle with the customer directly. Create a customer and service location explains the records.
For a shop-based business, you may not need a different customer service address for every booking. Choose the record structure that reflects where the work actually takes place, and avoid duplicating the same customer just to track a second vehicle.
Plan time without double-booking your crew
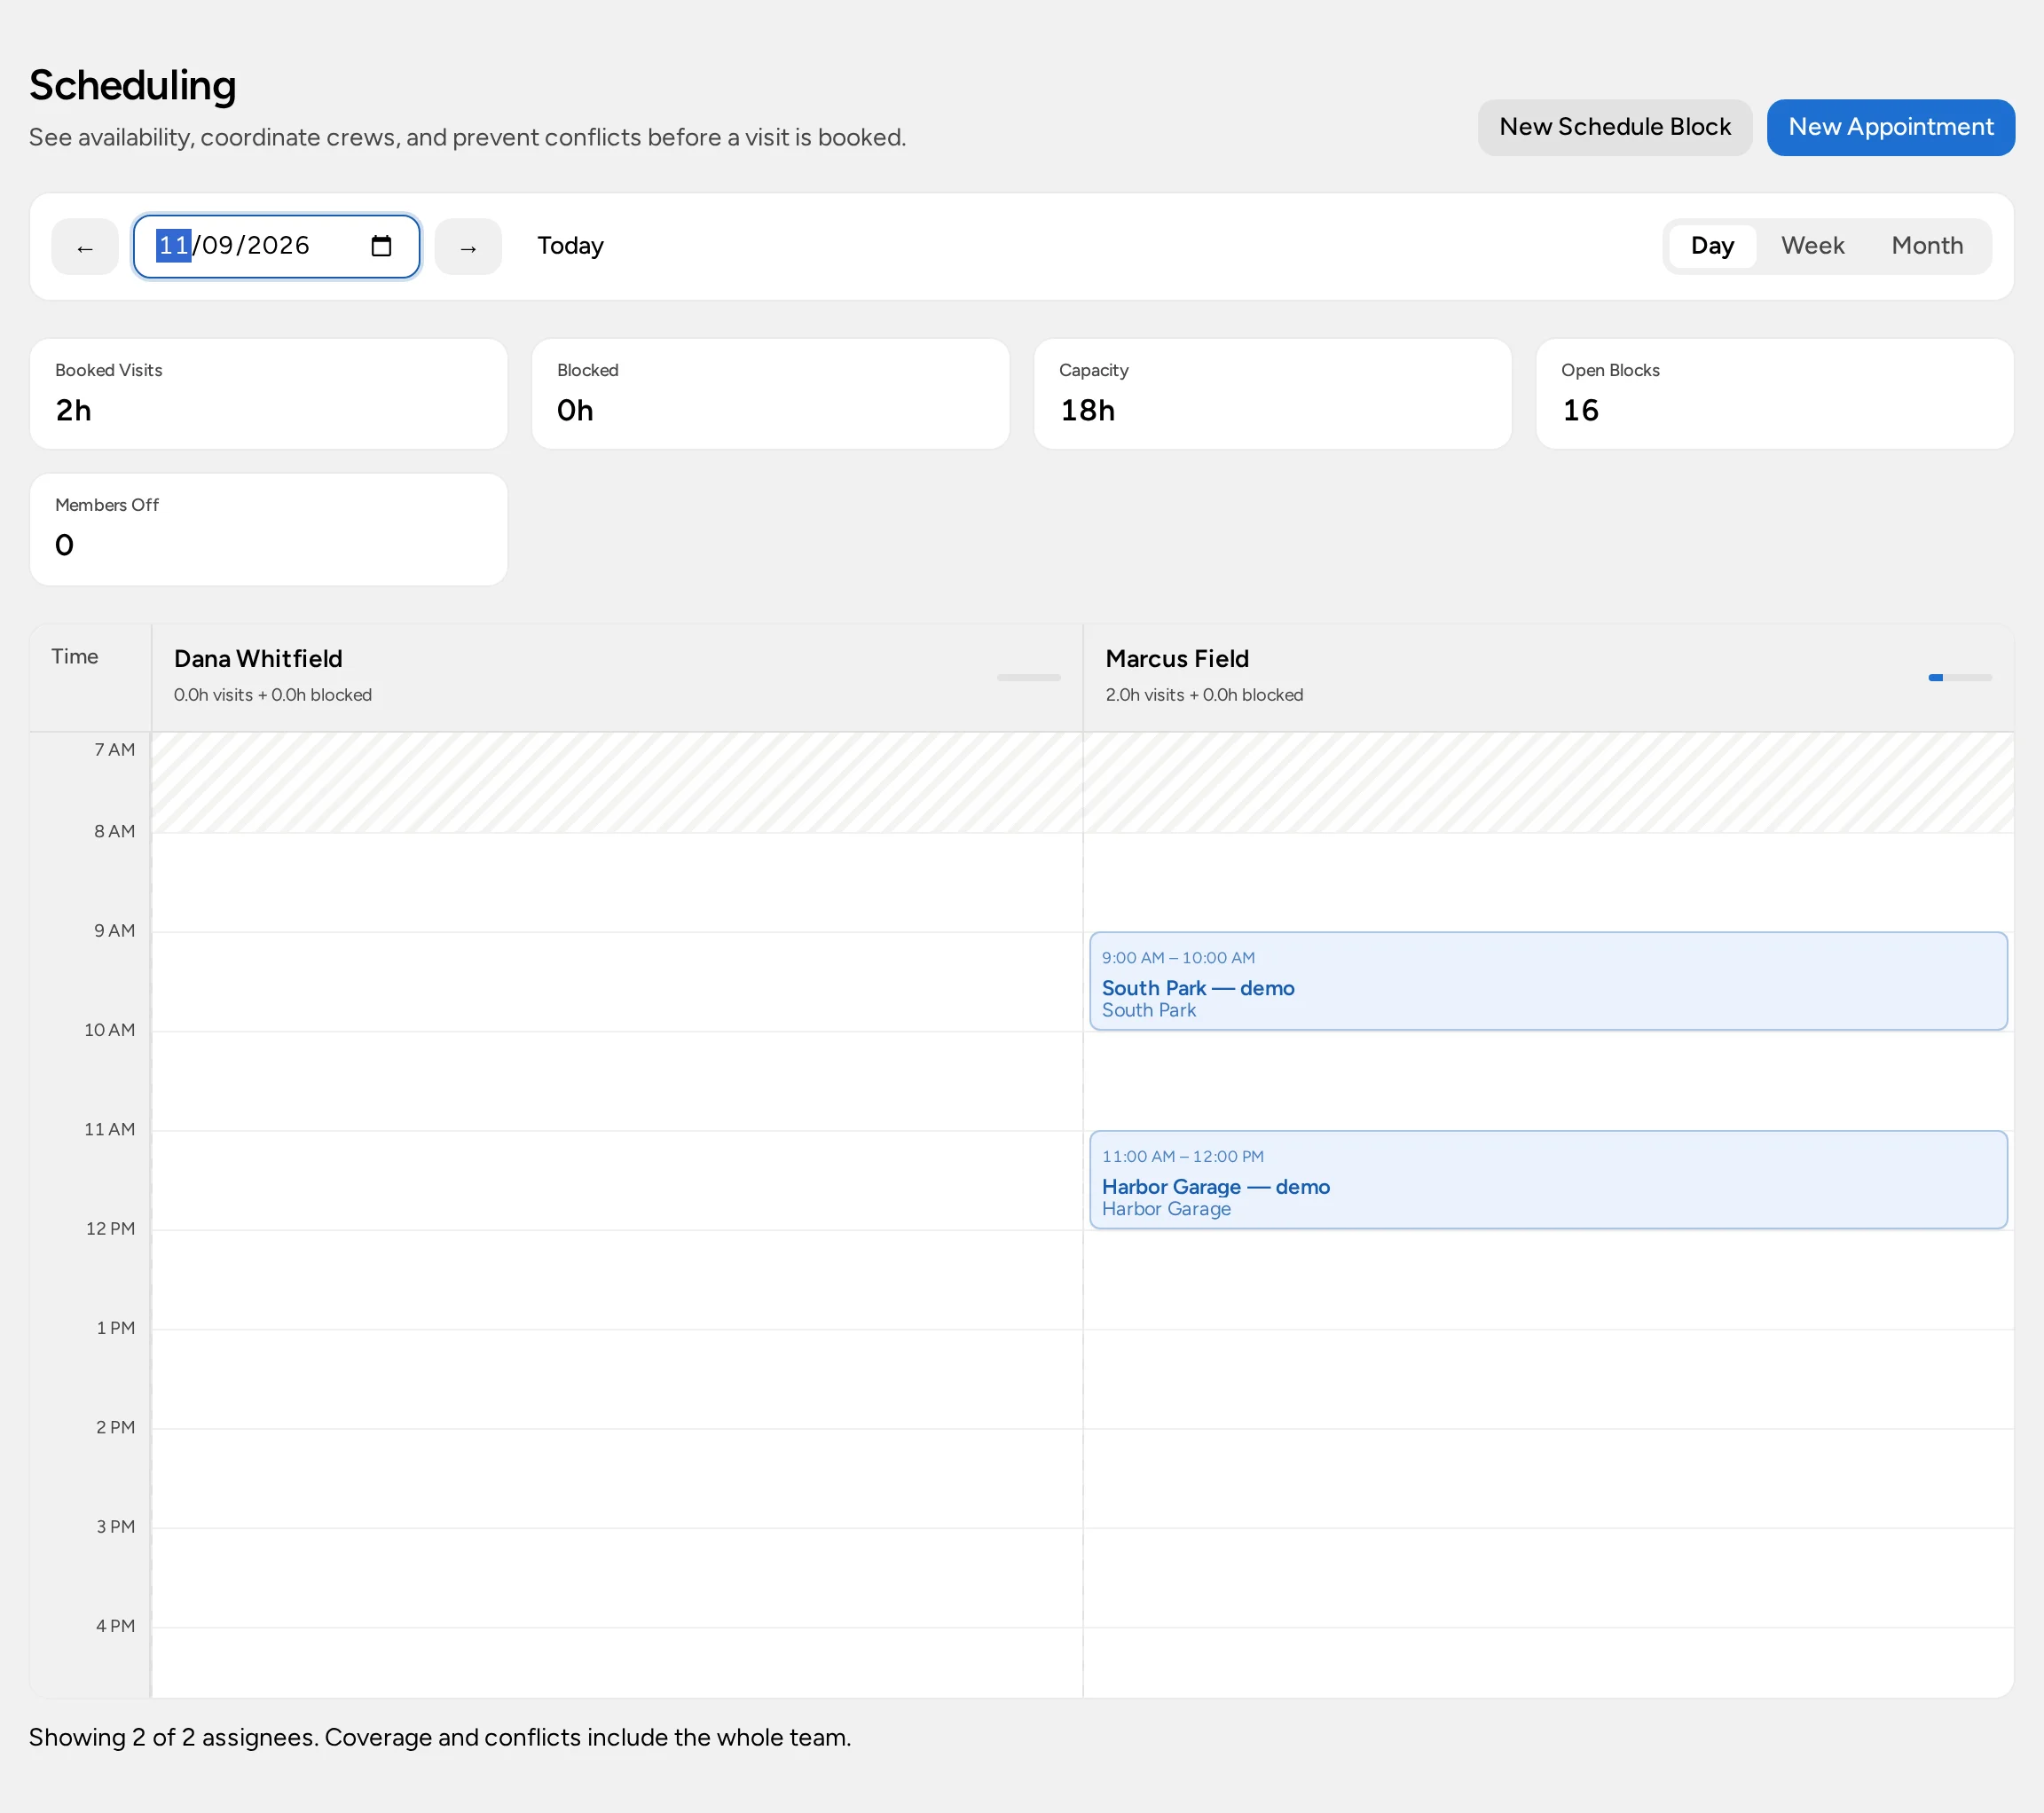
A solo operator can use My Schedule to block out time for a call, estimate, or other personal work. If you coordinate people visiting customer locations, the Field Service add-on on Basic or Pro provides a dispatch board and assigned visits in My Day. Your organization must enable that experience and give team members the appropriate access. Compare the scheduling views before choosing one; a personal schedule block is not a field-service visit.
Field Service is an optional $20/month add-on per organization on Basic or Pro. The no-card Pro trial can include Field Service. Enterprise is custom-scoped: confirm Field Service in your agreement. Your organization must select that scheduling experience, and each person's role still controls access. Compare plans.
Leave enough time for travel and an inspection when you plan the day. Confirm the arrival window with the customer rather than treating a calendar entry as a customer notification.
Check each booking against the actual scope
Before confirming a mobile visit, check that the worker, site, and requested service match. A customer might give a home address for the detail but ask to move it to an office car park. Change the intended work site deliberately; don’t overwrite the billing address to make the calendar look right. If a second vehicle is added, review the time and price before booking more work. A second car isn’t automatically part of the first visit or invoice.
The worker can check the address and site notes in My Day when Field Service is active, while the scheduler can review the team’s board. If either view shows the wrong visit date, resolve it before telling the customer when someone will arrive. A saved calendar entry is not itself a delivered confirmation.
Close out the job and review payment
Once the work and price are agreed, prepare the appropriate quote or invoice. Review and send the invoice using its own action; marking a visit complete doesn’t send a document or record a payment. The invoice guide walks through that handoff.
Keep any condition reports, liability waivers, chemical handling procedures, and local business requirements in the processes your business needs. This guide does not replace them.
Connect card payments before offering checkout
The card you use to pay for an Opsentric plan does not let your detailing customers pay you. Someone with settings access opens Administration → Payments, connects the organization’s Stripe account, completes provider onboarding, and saves an active Online payment income category. Check that acceptance is enabled before sharing a payment link. The online payment setup guide walks through it.
For an eligible issued or approved invoice, staff with invoice-management access can choose Stripe Checkout in Collect Payment, or share the private invoice link so the customer can use Pay Invoice. They enter their card with the provider, not in a lead note. Wait for the confirmed payment entry before recording anything manually; Card (non-Stripe terminal) only records a charge you took elsewhere.
Track products and travel costs
Chemicals, towels, and equipment purchased for the business are expenses; the customer invoice records what you charge. Issuing it does not mean the customer has paid. Keep those records separate so a busy day of bookings does not hide what you spent. Opsentric can hold the receipts and expense transactions alongside your customer invoices, but it doesn’t allocate each bottle of product to a vehicle or calculate profit per detail.
After a supply run, open Receipts → Upload Receipts if your role allows it. A detailer can upload the file without access to the ledger. Someone with finance-management access should review Needs Review, check vendor, date, total, and expense category, then attach the receipt to a purchase already recorded in Ledger or choose Create Expense. Uploading a receipt alone does not record the cost, and a second photo of the same purchase should not become another expense. Follow the receipt guide.
At week’s end, review the recorded expenses and outstanding invoices separately. A provider-confirmed customer card payment creates linked income; do not record the same payment again manually. The daily routine guide gives the finance owner a checklist for unfinished receipts and balances.
Test the workflow with one booking
- Add a customer and record the requested detailing work as a lead.
- Confirm the work location and the scope with the customer.
- Set aside your own time or book a team visit using the scheduling experience you chose.
- Prepare the proposal or invoice, and check what has actually been sent and paid.
- Upload a fictional product receipt and have the finance owner attach it to an existing purchase or create the expense once.
- Review unreviewed receipts, outstanding follow-ups, and invoices using the daily routine guide.
Keep the first workflow small enough that you can check each handoff. Add more structure only as the volume of bookings warrants it.